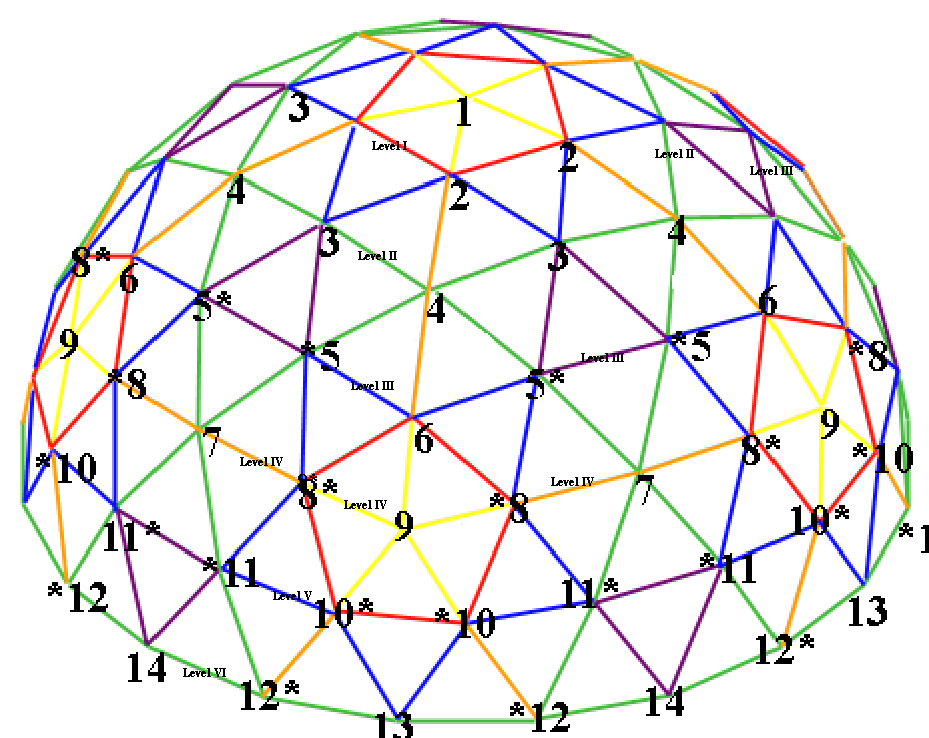
Camp Contact utilizes many 4V 30' Diameter Domes. The assembly of this dome is time consuming, but by knowing a few tricks and understanding the format, it is easier to understand. This outlines our Top Down procedure for putting the dome together. It requires between one and ten (or more) people during the various stages of the assembly, and there are three key roles:
Staging, Bolter, Curve Maintainers, for fourteen phases of assembly.
Parts: 4V Domes consist of struts of six different lengths connected by Bolts of two differnent lengths. Short bolts are painted yellow on top.
Staging - places out the required colors for each step at the right intersections. Please avoid getting involved with attaching bolts to struts, stand back and help direct the bolters to the places that need bolts. These domes are pentagonal, meaning each phase (except the 1st) consists of attaching the same set of colored struts five times in a row. Asterixes below indcate that the phase has two parts to it that are mirror images of eachother. The items to be distributed at each of the five strut intersections are in brackets in bold below.
Phase 1: (First Pentagon) [1 YELLOW & SHORT BOLT] Retrieve five yellow struts and a short bolt and provide them to the bolter. You may want to use an Eye bolt for this phase in case you want to attach something to the top of your dome. {Level I}
Phase 2 (Blue Triangles with Red bases) [1 RED, 2 BLUE, 1 ORANGE & 1 LONG BOLT] Retrieve five red, ten blue and five orange struts. Provide them at each of the five corners of the pentagon.
Phase 3 (Start the Purple Triangles) [2 GREEN, 2 PURPLE & 1 LONG BOLT] Retrieve ten purple and ten green struts, and provide two purple and two green struts at each of the corners where the two blue struts will come together to form a triangle.
Phase 4 (Green and Orange intersections) [2 GREEN, 1 ORANGE & 1 LONG BOLT] Retrieve ten green and five orange struts, and provide two green and one orange strut at each of the places where there are already two green and one orange strut set to come together.
Phase 5* (Complete the bottom of the purple triangles) [4 BLUE, 2 GREEN, 1 PURPLE & 2 LONG BOLTS] Retrieve five purple struts. Distribute one purple strut in between each of the existing purple struts. Then retrieve twenty blue and ten green struts. Distribute two blue and one green strut at each end of an existing purple strut.
Phase 6 (Pentagon tops) [2 RED, 1 YELLOW & 1 LONG BOLT] Retrieve ten red and five yellow struts. Distribute two red and one yellow strut at each empty orange strut.
Phase 7 (Repeat of Green and Orange intersections) [2 ORANGE, 2 GREEEN, & 1 LONG BOLT] Retrieve ten green and ten orange strut, and provide two green and two orange strut at each of the places where there are already two green struts set to come together.
Phase 8* (Flesh out the pentagons) [2 BLUE, 2 RED, 2 YELLOW & 2 LONG BOLTS] Retrieve ten blue, ten red and ten yellow strut. Distribute one blue, red and yellow strut and one bolt at each existing red strrut which is at either side of the red pentagons that are being built.
Phase 9 (Put the centers in the pentagons) [2 YELLOW & 1 SHORT BOLT] Retrieve the remaining ten yellow struts and distribute two each near the existing, open ended clusters of three yellow strruts.
Phase 10* (Complete the pentagons) [4 BLUE, 2 ORANGE, 1 RED, & 2 LONG BOLTS] Retrieve the remaining five red strut. Distribute the five red strut between each of the existing open ended red strut. Retrieve twenty blue strut and ten orange strut. Distribute two blue struts and one orange strut at each open ended red strut.
Phase 11* (Doors can be made here. Purple triangles at base) [3 (or 2) PURPLE, 2 GREEN & 2 LONG BOLTS] Retrieve the remaining fifteen purple struts, and ten green struts. Distribute three purple struts and two green struts in the are between each pentagon around the circle. THIS IS THE PHASE WHERE YOU CAN WITHHOLD THE TOP PURPLE STRUT from the triangle to make an Entryway (door) for the dome.
Phase 12* (connect Green & Orange) [2 GREEN & 2 SHORT BOLTS] Distribute two green strut at each existing Green & Orange set around each space between two open ended struts. All strut are used at this time.
Phase 13 (Connect Blue V) [1 SHORT BOLT]
Phase 14 (Connect Bottom of Purple Triange) [1 SHORT BOLT]
*Indicates that this step is a two part phase. This means that for each interesction, there is a corresponding intersection nearby that needs to be completed for each phase.
Bolter --TOOLS Required:
- Cordless Impact Driver with a socket for the top bolts
- Combination Hand Wrench for the nuts that attach the bolts
- Large Pipe Wrench Pliers
Bolters ensure that there is a 7 degree angle at the end of the strut, and they use the Large Pipe Wrench Pliers to bend it into shape if needed. They then gather the struts that are already attached to the dome and drive the bolt through the holes for it using the driver. Then they will attach the free floating struts for this intersection, and attach the bolt without tightening it. Leaving the intersection loose at this point allows for freedom to adjust it as its going up.
Curve maintainers can help them hold the free floating struts in place. There may be two bolters, and it may make preferred for bolters to have their own collection bolts with them. As new Levels are started, bolters will need to do the job of the Secondary bolter, described below.
It generally does not serve to put a nut onto a bolt that doesn't have all struts already attached to it.
Secondary Bolter-- goes to each intersection and tighten intersections that are off the ground once a new level is reached.
Curve Maintainers & Erection:
A big part of getting the dome up is holding the struts in place so that it is easy for the bolter to put the bolt through the attached and floating pieces. Curve Maintainers do the job of holding the dome in place and keeping their eye on the bolter and the struts that are coming together. Their main job is to "Get the Curve On" of the dome so that it stays curved. Its easy for the dome to have intersections collapse inwards.
As the dome is built, it gets to new levels. Once a level is completed, you may want to gather a group of people to assist in lifting the dome up to its higher level.
Level I (First Pentagon) [RED]: Best supported by an action packer/box or a folding ladder placed on the side. Phases 1 & 2
Level II [GREEN]: Best supported by a few action packers stacked or a folding ladder that is at its 4' setting. Phase 3 &4
Level III [BLUE & PURPLE]: Best supported by a fully erect folding ladder. Phases 5 & 6
Level IV [ORANGE & YELLOW]: Best supported by 5 to 10 helpers. May get some support from a folding ladder. Phases 7, 8 & 9
Level V [BLUE, RED & PURPLE]: Best supported by 5 to 10 helpers. May get some support from a folding ladder. Phases 10 & 11
Level VI (Final Level) [GREEN]: Dome will support itself at this point as you attach each intersection. Phases 12, 13, & 14
Heuristics! These are general facts that help better understand the construction and process of assembling the dome
- Yellow is only used for the inside of pentagons.
- Red is only used for the outside of pentagons.
- Orange is only connected in line with other oranges or yellows.
- Green is only connected in line with green.
- Purple is only connected in line with blue (but not visa versa).
- Two blue struts only form triangles with red bases Two Purple struts only form triangles with purple.
- Two Green struts only form triangles with a purple base. Bolts don't have to be made super tight, but should be tightened up as a new layer of construction is completed.
David's Rules:
Every shape is either a Pentagon or a Hexagon
Domes are able to not have a ladder at the point when the first yellows (besides the top yellows) are introduced.
Always tighten joints two joints away going above from the joint you're connecting.
The structure of the dome and further reading is available at Desert Domes